So what will I share with you for the Parade of Ornaments? Like most of you, I have many treasured ornaments that adorn my trees and home. Each is special in its own way. Some were gifts, some our children made for us, and still others are family heirlooms passed down to share with the next generations. It's just so hard to choose.
I finally decided to share with you some crafty, homemade ornaments that I made with my Girl Scouts years ago. I was Troop Leader for my daughter's troop for 6 years. We made ornaments every year and here are 2 that I want to share with you. They are super easy and really inexpensive and perfect for crafting with the kiddos.
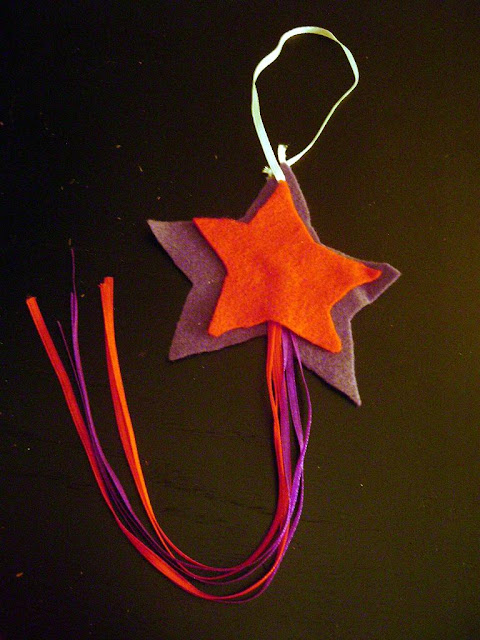
First up is what we called our "Shooting Stars". We made these when the girls were in 2nd grade at Christmas 2001. Just a few short months after 9/11. I wanted something that would be patriotic, yet still Christmasy (new word).
Supplies needed:
Felt in various colors.
Thin ribbon.
Yarn.
Stapler.
Hot Glue Gun.
Scissors.
I have somewhat deconstructed one of the originals to show you how easy this can be.
First, I made 2 star templates ahead of time. One about 1/2" larger than the other. I had the girls trace the stars onto felt and cut them out.
Next they cut ribbon, using a piece that I had pre-cut as a guide for length. They cut 6 strips, three red and three purple in the example below. Next they stapled the ribbon pieces together at one end.
Then under careful supervision of an adult they hot-glued the stapled ribbons to the center of the larger star.
Once the stars were glued together, we made a small slit at one of the points of the larger star with a pair of scissors. We then put a piece of ribbon or yarn through the slit and tied a knot. This is what you will hang it from on the tree.
Lastly, they centered the smaller star on the larger star and hot-glued them together.
It probably took more time to type these instructions than it did to actually assemble the star.
The girls enjoyed this craft because they were able to trace, cut, and assemble the entire thing. I think this was the first time we let them use a glue gun at a troop meeting. If you prefer not to use a glue gun, you could always use fabric glue instead.
Besides the fun Christmas colors of red/purple, we also chose to do the traditional red/white/blue stars as well. For these stars, the six ribbons were 2 red, 2 blue, and 2 white.
They hold up so well from year to year. We always look back at them with fond memories of all of our girl scout crafts, and also with memories of a somewhat respectful and solemn Christmas of 2001.
You can make just a couple to add some fun to a tree, or make a whole bunch of them to scatter across your tree. Have fun!!
-------------------------------------------------------------------------------------------------------------------------------------------
The second kid-friendly diy ornament is what I call the "Ragamuffin Sticks". This one is even easier than the first.
Supplies needed:
Stick from the outdoors.
Fabric scraps.
Button or similar adornment.
Yarn or twine.
Hot glue gun.
We had the girls collect sticks and bring them to a troop meeting. We provided fabric scraps, which they cut into small strips. Each girl then tied the fabric strips to their stick from top to bottom, leaving some room at the top.
The girls then chose from an assortment of buttons and again, with the supervision of an adult, they hot-glued a button to the top of the stick.
They then turned their stick over and hot-glued a loop of twine to the top of the stick...
...and that is it, officially the world's easiest Christmas DIY ornament.
Have fun with the color combinations of fabric.
Also, you could substitute cinammon sticks for the outdoor sticks. This will give your tree a sweet cinammon scent.
Just as with the stars, you could add a couple to the tree, or color coordinate your fabric to match your tree theme, and really go crazy with them.
I hope you have enjoyed these kid-friendly, easy-peasy DIY ornaments.
Simple to make, inexpensive, and yet priceless time spent with the little ones in your life.
Have fun!!
Now, head over to Censational Girl and check out the Parade of Ornaments.
It's certain to be fabulous.
Then go visit Kimba at A Soft Place To Land. Today is DIY Tuesday and I am linking up. I just love her DIY Day, don't you?
---------------------------------------------------------------------------------------------------------------------------------------------------------------------------
Then check back in one week from today, on Tuesday, December 15th.
That is the day of the Holiday Cookie Exchange.
This week, be sure to make your grocery list, get your supplies, bake your cookies, and take lots of photos. Then blog about your favorite recipe and come back here on 12/15 to link up and share with all of us.
I can't wait to see what you all have baked for your Holidays. I'm looking for some new cookie recipe ideas too!


Oh yay Stephanie, I got to be the first ! Your ornaments are so fabulous.... what a great tutorial and you make it look so easy ! Thanks for joining the party.... come on over and link up on the site and share your creativity.
ReplyDeletexoxo
Ms. Kate
http://www.centsationalgirl.com/2009/12/an-ornament-party/
cute! thank you for sharing.
ReplyDeletejanice
I love the stars! You could really color customize.
ReplyDeleteI hope that you will come by and see the ornaments I made: pearl encrusted star, crystal and button ball and an anthro inspired tree topper.
I have one of the stick/flower ornaments, too! I put it on my tree every year and always get a little misty when I do the kids hand-made ornaments from when they were little.
ReplyDeleteAbout the pot ~ my pot that I did has dirt in it. A brick or two might work, but the dirt was great for sticking all the greenery into. We can get some wicked winds by my house {actually expecting a storm tomorrow}, so we'll see if it holds up.
I really miss having little kids to do projects with. My daughter loves anything crafty and we used to have such fun!
ReplyDeleteSue
The star is neat..., and it could be made with different materials/fabrics too. Happy Holidays!!
ReplyDeleteStephanie,
ReplyDeleteVisiting for the first time from Centsational's party. Love your ornaments. Looks like your kids had a great time making them and, probably made a few good memories while they were at it!
Christi @ A Southern Life
What beautiful ideas and they look easy enough for someone like me to cope with! I love decorating with my kids too-it makes everything just that little bit more special!
ReplyDeleteSo nice of you to visit and thanks for leaving a comment. I will have to come back soon and check out some of your older posts.
Best wishes, Natasha.